Pages

Sunday, 19 August 2012

Autumn Accents Ornament Wreath Tutorial

Thank you for all your lovely comments about my little autumn decoration, both on here and elsewhere on line.

As I mentioned before this was based on the Holiday Ornament decoration on the front page of the new Autumn Winter catalogue and I just used the same technique to make this.

First of all cut 20 large leaves using your Autumn Accents die and More Mustard card stock
 (you will need about 3 1/2 A4 sheets) and another 20 smaller leaves using Old Olive card stock
 (less than 2 full sheets of A4)

  
Ink all the edges using a sponge dauber. I used Pumpkin Pie ink on the More Mustard leaves and Always Artichoke ink on the Old Olive leaves. 
 

Then stamp all over each leaf using the script and water splash stamps from French Foliage. Again I used Pumpkin Pie ink and Always Artichoke ink.

WARNING! Now you may notice in the picture above that I have die cut, inked and stamped the oak leaf, which was fine and dandy until I realised that it wasn't symmetrical and that I couldn't fold it in half to make a mirror image - whoops!


So then I die cut another twenty of the smaller leaves - now these are not quite symmetrical either but they are close enough that when you ink the edges you don't really see the bits that don't quite line up.

If you really wanted to use the oak leaf you could do this by folding your card in half BEFORE running it through your big shot. If the fold of your card runs down the middle of any of the leaves then you will end up with a mirror image leaf.
Then I took 5 of the More Mustard leaves and 5 of the Old Olive leaves and set them to one side. I scored the remaining 15 leaves in each colour down the centre using my Simply Scored tool.
 
 HELPFUL TIP!: You might notice that I have marked lines on my Simply Scored. This makes it easier to make sure you are scoring the correct line as the Simply Scored has so many grooves on it. I just used a Stampin' Write marker and ran it down the 2", 4", 6", 8" and 10" lines.

Now you need to fold all your scored leaves in half


Glue the three folded leaves together, making sure the shape lines up, and then glue these on to your unscored leaf base. I used my tombow liquid glue for this.
 

Once your leaf is assembled it should look like this.

Then I used the largest flower from the Fun Flowers die as a base. You don't need to do this but I found it helpful as it has 5 petals so it makes it a bit easier to place your leaves evenly. The next one I make I would probably put the leaves a smidgen nearer the middle than shown in the photo below.
I used a hot glue gun to attach the leaves at this stage.


I then cut 5 lengths of Cherry Cobbler Scallop Tulle ribbon - about 4 scallops long in each case and sort of pinched the middle and folded them in half before gluing them in the spaces between the 5 larger leaves using my glue gun.

I then cut 5 lengths of linen thread, folded them in half, and tied a knot. Use your glue gun to place a large dollop of glue in the middle of your wreath and then add the linen thread so it more less lines up over the large leaves.
Add another large dollop of glue in the middle and add the Old Olive leaves.
A mini rosette was made using a 1/2" strip of paper cut from the Candlelight Christmas Speciality DSP and finished off with an antique brad.

To finish it off I cut a small length of Old Olive 1/8" Taffeta Ribbon and glued this on the back to make a loop to hang the wreath up.

Hopefully that is clear but if you have any other questions please do let me know.

Friday, 17 August 2012

New Autumn Winter Catalogue is on its way...

...and as a demonstrator one of the perks is getting to order certain items from the catalogue early.

Now I can't show you the catalogue until it goes live on 1 September but there is an amazing Christmas ornament on the front page using some new stamps called Ornament Keepsakes. Unfortunately the stamps were not included in the pre-order this time, so I will have to wait until 1 September to get hold of them. But in the meantime I thought I would see what I could come up with along the same lines, using some of the new products that arrived today.

Autumnal mini wreath/ornament


The new products I used were the Autumn Accents die (which has 5 different leaf shapes, and there is also a matching stamp set) and the Cherry Cobbler Scallop Tulle ribbon that is just lush. I also used a little strip from a sheet of Candlelight Christmas Speciality DSP.
The leaves were stamped using stamps from the French Foliage set.
The card stock is More Mustard and Old Olive.

If you'd like a step by step tutorial please let me know by leaving a comment and I'll see what I can come up with over the weekend.


Wednesday, 15 August 2012

Craft Fair

I promised I would share some photos of the craft fair last weekend. This was our stall all set up (I say we as I had my daughter Kirsten to help me out and she did a really great job helping to arrange the stall). Apologies for the quality of the photos as they were taken using my phone.


Some cards:
My little sewing kits and owl tissues

Covered notebooks and keyring post it notes

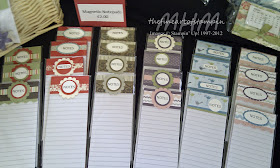
Magnetic note pads

Tealight birthday cake in a box

The notepads in more detail


And a close up of the post-it note key rings


Magnetic notepads

Peg Magnets


 2013 calendars on acrylic holders
Acrylic post it note holders and matching pens


Tuesday, 14 August 2012

A short break in Scotland

You may have noticed a lack of posts this week. We were away for the weekend and then busy making lots of things for a craft fair last Sunday.

Our first stop on our weekend away was to the Falkirk Wheel - the world's only rotating boat lift
 It lifts you (and the canal boat) approximately 35 metres high. The lift replaces 9 locks on the canal and what used to take all day to travel through the locks now takes about 5 minutes.
 However because of the Antonine Wall (Roman wall) they couldn't replace all 11 locks so there are still two locks to navigate.

We also took a walk through the woods to visit part of the Antonine wall and roman fort.
 

Next we visited Dunfermline Abbey - burial place of eight Scottish Kings and St Margaret.
 We finished our Scottish theme by going to see the new Pixar movie Brave - if you haven't seen it yet you must go and see it. It was so funny!

We stayed for a couple of days at Broughty Ferry, just outside Dundee. This was Broughty Ferry Castle when we went in.

 And the view from just outside the castle of the Tay Bridge.
 And this was the "view" just ten minutes later when the sea mist rolled in!

We visited the Science Centre in Dundee and Kirsten experienced hurricane strength winds - not very good for the fringe! LOL

 The next morning we drove down to Edinburgh for a couple of days where we went to a few shows at the Edinburgh Fringe. I think our favourite was Hamlet the Musical.

Edinburgh shared our Olympic Fever and we managed to catch Andy Murray winning his gold medal (yaaay!) on the big screen set up at the BBC.

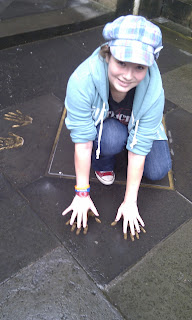
We also visited Sir Chris Hoy's golden hand prints.
And his newly painted golden post box
 Kirsten and I also went on the Harry Potter tour on on first night here. Even though it rained for part of the time it was awesome. Our guide Ruth (or Luna Lovegood as she preferred to be called ) was great and took us to Voldemort's grave, Kirsten was chosen to be sorted by the sorting hat (she got Gryffindor :-D ) and other Potter sites.

Kirsten went back the next day to visit J K Rowling's golden hand prints (next to Chris Hoy's).

 And also those of Professor Higgs (the Higgs in the recently confirmed Higgs-Bosun particle)

And then we got to have lunch at the cafe where J K Rowling first put pen to paper for the first ever Harry Potter book - Harry Potter and the Philosopher's Stone. She did write the books (up to book 4) in cafes all over Edinburgh but she has confirmed that Nicholson's cafe (now the Spoon Cafe) was the one where she first started writing the books.
 

Back tomorrow with some more craft related posts!

Sunday, 12 August 2012

Craft Fair today

Hello everyone. Apologies for the lack of posts this week.
We were away for a few days (managed to see some shows at the Edinburgh Fringe) and since I got home I've been busy making lots of goodies to sell at the craft fair today.

If you're in the area why not pop in to Kelburn Country Centre today and support a very good cause (see sidebar for more information).

Hope to be back posting again in the next few days!

Tuesday, 7 August 2012

Halloween in August!

I know it might seem a bit early for Halloween but these projects were made using the Frightful Sights paper that is only available until the end of September (or until stocks last) so I thought I would show you them now so you have plenty of time to get your order in.

The Simply Scored Scoring Tool makes it really fast and easy to make the rosettes. I scored the paper before cutting it in to narrower strips and the sped up the process a lot!

 The ghost and bat were made using the ever versatlile owl builder punch


And some more projects using this paper (alsosome of the reverse sides are not particularly "halloween-y" and are great for masculine cards).